Guide to Using the Panasonic HDC-TM900

This is a © Copyrighted Blog, pictures and information from Canon and Campbell Cameras and should not be used without their permission, by email Johanna@Campbelloutdoorchallenge.com, by phone: 618-382-7939 or by mail:
Campbell Cameras
Attn: Johanna Campbell
1327 Co. Rd. 800 N.
Carmi, IL 62821
Everything written in RED are KEY things that you should remember and pay extra attention too.
Everything written in BLUE are ways to use the camera for hunting situations, learning material, and/or recommendations by Johanna.
If you have any questions about this blog, camera, or anything else feel free to comment below or contact us using the information provided above.
Looking for true HD (1920x1080 60p) in an affordable compact camera to capture those amazing outdoor moments? The Panasonic HDC-TM900 is the answer. This little camera (under 1 pound) has 32GB of internal flash memory capable of recording up to two hours at 1080/60p. This is possible because of its three ¼ inch CMOS processors, unheard of in a compact camera. The 46mm lens and 12x zoom give you sharp full images. The TM900s focus ring rivals that of professional cameras and a full-size cold shoe makes adding accessories a breeze. More info here.
Guide:
Power Supply:
Batteries that work with this camera: VW-VBN130 and VW-VBN260.
How to insert the battery:

Removing the battery: ***Make sure that the camera is powered off***

Charging the battery: ***Battery is not charged when you purchase the camera, make sure to charge the battery completely before the first use***
1) Connect the AC adaptor to the DC input terminal.
2) Connect the AC cable to the AC adaptor, then the AC outlet.
The red light will turn off when charging is complete

Charging and Recording Time:
| Battery Model Number | Charging Time | Recordind Mode | Maximum Continuous Recordable Time | Actual Recordable Time |
| Supplied Battery/ VW-VBN130 | 2 hours 30 min | 1080/60p | 1 hour 30 min | 55 min |
| HA | 1 hour 35 min | |||
| HG, HX, HE | 1 hour 35 min | 1 hour | ||
| iFrame | 1 hour 40 min | 1 hour | ||
| VW-VBN260 (optional) | 4 hours 30 min | 1080/60p | 2 hours 55 min | 1 hour 45 min |
| HA | 3 hours 5 min | |||
| HG, HX, HE | 3 hours 10 min | 1 hour 55 min | ||
| iFrame | 3 hours 15 min | 2 hours | ||
Turning the Camera ON/OFF:
Press the Power button to turn on the camera.
To turn off the camera you hold down the power button until the status indicator goes off.

Turning the Camera on/off with the LCD monitor/Viewfinder:
Opening the LCD monitor or extending the viewfinder turns on the camera. Closing the LCD monitor/viewfinder turns off the camera.

Selecting a Camera Mode:
Change the mode to recording, photo capture, or playback.
Operate the Mode Switch to change the mode to Motion picture recording mode, still picture recording mode, and playback mode.

How to use the Touch Screen:
You can operate by directly touching the LCD screen with your finder. It is easier to use the stylus pen (supplied for detailed operation or it is hard to operate with your fingers.
Touch:
• Touch and release the touch scree to select icon or picture
• Touch the center of the icon.
 • Touching the touch screen will not operate while you are touching another part of the screen.
 Slide while touching: Move your finger while pressing on the touch screen.
To display the Touch Menu:
The touch menu will disappear when no function is performed for a specific period of time. During recording more. To display it again touch the left and right arrow button.
Recording to a Card:
You can use SD cards, the built-in memory or HDD to record still images and video. You can use SD, SDHC, SDXC memory cards with this unit.
Campbell Cameras recommend that you use at least a Class 6 card or higher when recording HD. We also don't recommend using lower than a 32gb Class 6 Card.

Inserting/Removing SD Card:
***Never insert or remove an SD card while the camera is turned on***
1) Open the LCD monitor.
2) Open the SD card/terminal cover and insert (remove) the SD card into (from) the card slot.
3) Securely close the SD card/terminal cover.
Access Lamp A: When this camera is accessing the SD card or built-in memory, the access lamp lights up. Never Remove or insert SD card while this light is on.
Formatting Media:
***When you Format an SD/SDHC/SDXC card all of the data recorded on the medium will be erased and cannot be restored. Back up important files on your computer or an external hard drive.***
When to format your card/Internal Memory:
1) When it is a new card, before recording to the card.
2) After you have transferred all your files and stored them on your computer or an external hard drive and you want to use the same card to record more videos.
How to Format your SD Card/ Internal Memory:
1) Press the A/Manual button to bring up the Menu
2) Touch [MENU] on the LCD Touch Screen.
3) Touch [SETUP] on the LCD Touch Screen.
4) Use Bottom Down Arrow to scroll to the 6/7 page and touch [FORMAT MEDIA]
5) Select either the Internal Memory or the SD Card, whichever one you want to format.
6) It will pop up a screen to make sure that you want to do this, if you do select [YES] and it will format your card.

Selecting a Media to Record (internal or SD card)
1) Touch the Left and Right Arrows on the LCD Touch Screen to bring up the [MENU] button.
2) Touch the [MENU] Button
3) Touch the [RECORD SETUP]
4) Touch the Media to record motion pictures or still pictures (the one selected is highlighted in yellow)
5) Touch [ENTER]

Relay Record Function
This allows you to continuously record video to an SD card when there is no space available in the built-in memory.
• Set [MEDIA SELECT] to [BUILT-IN MEDIA]
• Insert SD Card
1) Touch [MENU]
2) Touch [RECORD SETUP]
3) Touch [RELAY REC]
4) Touch [ON]
•  is displayed on the screen. When it disappears, it means that the space in the built-in memory is going and the recording to the SD card starts.
is displayed on the screen. When it disappears, it means that the space in the built-in memory is going and the recording to the SD card starts.Recording Videos:

1) Change the mode to Video
2) Open the LCD monitor or extend the viewfinder to turn the camera on.
3) Press the recording start/stop button to start recording.

4) Press the recording start/stop button again to pause.

5) Screen indications in the Video Recording mode:
A- Recording Mode
B- Recording Time Elapsed- Each time the unit is put into recording pause, the counter displays will be reset to 0h00m00s.
C- Approximate remaining recordable time. (when the remaining time is less than 1 minute, R0h00m flashes red.
• Screen display will disappear when no function is performed for a specific period of time. To display it again, touch the screen. (it will not display when AF/AE tracking is used).
Recording Modes:
There are 3 recording formats that can be used with this camera: AVCHD that records high-definition motion pictures, 1080/60p that records motion pictures in maximum quality for this camera and iFrame that records motion pictures suitable for playback and editing on Mac (iMovie'12).
| Recording Time | [1080/60p] | [HA] | [HG] | [HX] | [HE] | [iFrame] | |
| Picture Size | 1920 x 1080 | 1920 x 1080 | 1920 x 1080 | 1920 x 1080 | 1920 x 1080 | 960 x540 | |
| SD Card | 32 GB | 2 hrs 40 min | 4 hrs | 5 hrs 20 min | 8 hrs 20 min | 13 hrs 20 min | 2 hrs 40 min |
| 64 GB | 5 hrs 20 min | 8 hrs 30 min | 11 hrs | 16 hrs 50 min | 27 hrs 30 min | 5 hrs 20 min | |
| Built-in Memory- 32GB | 2 hrs 40 min | 4 hrs 10 min | 5 hrs 30 min | 8 hrs 20 min | 13 hrs 40 min | 2 hrs 40 min | |
| HDD (optional)- 220GB | 18 hrs 30 min | 29 hrs | 37 hrs 30 min | 57 hrs 30 min | 94 hrs | 18 hrs 30 min. | |
How to switch recording modes:
1) Touch the left and right arrows on the LCD Touch Screen to bring up the [MENU] button.
2) Touch the [MENU] button.
3) Touch the [RECORD SETUP] button
4) Touch the [REC Mode] button
5) Select the desired setting.
5) Touch [EXIT]

1080/60p Recording:
This is a 1080/60p (1920 x 1080/60 progressive) recording mode that can record in maximum quality of this camera.
***USE THIS IF YOU WANT TO RECORD IN THE HIGHEST QUALITY***

Intelligent Auto Mode:
 The following modes (appropriate for the condition) are set just by:
1) Pressing the [iA/MANUAL] button on the top of the camera until the [iA] appears on the LCD Touch Screen.

2) Point the camera to what you are recording and the intelligent auto scene is automatically selected.

***When filming most hunts, you will not want to record using the intelligent auto mode because it will auto focus for you. This means that it will focus on the three limb that it is in front of the deer instead of focusing on the deer itself. You will want to use manual mode for that***
Turning on the Quick Power On feature:
The camera is put into recording pause approx. 1 second when the unit is turned on. This will allow you to turn your camera on really fast and press record when an animal approaches.
1) Touch the [MENU] button
2) Touch the [Settings] button
3) Scroll through the pages until you get to page 2/7 and touch [QUICK POWER ON]
4) Set to [ON]

Turning on the Quick Start Function:
This camera is put into recording pause approx. 0.6 seconds after the LCD monitor is reopened or the viewfinder is extended. This will allow you to take your camera from standby to on in 0.6 seconds, allowing you to press record fast when an animal approaches.
• When in Quick start standby mode, about 80% of the power used in Recording pause mode is being consumed, so the recording time will be reduced.
• Quick start will not work if the [SD CARD] is selected in the [MEDIA SELECT], even if there is no SD card inserted.
1) Touch the [MENU] button
2) Touch the [Settings] button
3) Scroll through the pages until you get to page 2/7 and touch [QUICK START]
4) Set to [ON]

Turning OFF all Alert Sounds
1) Touch the [MENU] button
2) Touch the [Settings] button
3) Scroll through the pages until you get to page 3/7 and touch [ALERT SOUND]
4) Set to [OFF]

Zoom in/out function:
 Zoom lever/Zoom Buttons
T side: Close-up recording (zoom in)
W side: Wide-angle recording (zoom out)
• Maximum zoom magnification can be set with [ZOOM MODE], it is default set at the optical zoom at 12x. For best picture quality always have this has your maximum zoom magnification.
About the Zoom Speed:
The zoom speed will be faster in this order:
1) zoom lever/ring zoom
2) zoom button/zoom button on the remote control
3) touch zoom
• The zoom speed varies depending on the range over which the zoom lever is moved or the speed to rotate the ring.
• The zoom operation using the zoom button, zoom button on the remote control or touch zoom will be performed at a constant speed.
Ring Zoom:
Zoom operation can be done using the multi manual ring.
 You rotate the lens clockwise to zoom in and counter-clockwise to zoom out.
Image Stabilizer Function
Use the image stabilizer to reduce the effects of shake during recording. This camera is equipped with Hybrid Optical Image Stabilizer.

Recording with Touch Function
You can control some of the camera's functions by the LCD Touch Screen.
1) Touch the left / right arrows on the Touch Menu to display Touch Function Icons

Touch Function Icons:

Touch Zoom:

You can zoom by touching on the touch zoom bar.
1) Touch the [zoom icon] and the touch zoom bar will appear (it will disappear when no function is performed after a while, to get it back touch the screen)
2) You can either touch the zoom bar in a specific area to zoom to that amount or you can slide to the T to zoom in and the W to zoom out.
AF/AE Tracking
It is possible to set the focus and exposure to the subject specified on the touch screen. The focus and exposure will keep following the person or the animal automatically even if it moves.
1) Touch the Tracking Icon
2) Touch the person, animal or object and lock the target.
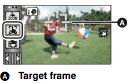 • When you touch the head of the object, the target frame on the head gets locked and tracking starts.
• Touch the object to be changed again when you want to change the target.
3) Start recording.
***This function can not be used in manual mode. It will not track objects when the scene is dark, or it has the same color as the background. It will be canceled and turned off whenever the camera is turned off or switched modes. ***
Time Lapse Mode
A scene that moves slowly for a long period of time is recorded frame by frame with an interval, and is recorded as a short time motion picture. A frame recorded with a set recording interval. 30 frames will make up motion picture of 1 second.
1) Touch [MENU]
2) Touch [RECORD SETUP]
3) Touch [TIME LAPSE REC]
4) Touch desired setting.

| Setup Example | Setup Time (Recording Interval) | Recording Time | Recored Time |
| Sunset | 1s | Approx. 1 hr | Approx. 2 min. |
| Blooming | 30s | Approx. 3 hrs | Approx. 12 secs. |
Example Video of Time Lapse done in Time Lapse Mode
AUDIO
Mic Setup:
Recording setting of the built-in microphone can be adjusted.
• Switch camera to manual mode.
1) Touch [MENU]
2) Touch [RECORD SETUP]
3) Touch [MIC SETUP]
4) Touch [Desired Setting]

***If you wish to record better sound and maintain realism even when zooming in, we recommend setting [MIC SETUP] to [SURROUND], if you are not using an external microphone***
*** If you have an external microphone connected when recording in [iFrame]. [MIC SETUP] is set to [Stereo Mic] automatically ***

Adjusting the Mic Level
When recording, the input level from the built-in microphone and the external microphone terminal can be adjusted.
• Switch to [MANUAL] Mode
1) Touch [MENU]
2) Touch [RECORD SETUP]
3) Touch [MIC LEVEL]
4) Select desired setting

 • When [SET +AGC] is selected, Touch the left and right arrows to adjust the microphone levels.
*** Adjust the microphone input level so that the last 2 bars of the gain value are not red. Otherwise you sound will be distorted. Select a lower setting for microphone input level.
• Touch [ENTER] to set the microphone input level and then touch [EXIT]
MANUAL MODE FUNCTIONS
Press the iA/MANUAL button or Camera Function button to switch to Manual Mode.
* MNL appears on the screen to let you know you are in manual mode.

Adjusting White Balance
Automatic white balance function will not give you natural colors depending on the scenes and lighting conditions, therefore we recommend adjusting the white balance manually.
(while in manual mode)
1) Touch [WB]
 2) Select Manual adjustment mode icon that looks like a flower
4) Touch and set the blinking icon
*** The setting is complete when the screen turns black and the icon stops flashing.***

*** Remember to re-set your white balance every time you change a location or your lighting changes!***
Manual Shutter Speed
Adjust it when recording fast-moving objects
(while in manual mode)
1) Touch [SHTR]
2) Touch the left and right arrows to adjust settings.
Shutter Speed 1/60 tot 1/8000
***The closer to 1/8000 the faster the shutter is. It is always recommended to use some kind of stabling device at all times but it is particularly important when you lower the shutter speed to have the camera on a tripod or other support. ***

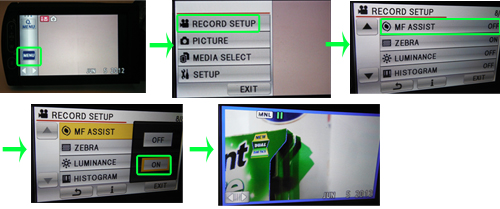
Manual Adjusting the Iris
Adjust the iris when the screen is too bright or too dark. A good tool when manually adjusting your iris, is the Zebra function. Parts where white saturation is likely to occur (extremely bright lit or shiny parts) are displayed with diagonal lines (zebra patterns).
Turn on the Zebra Function:
1) Touch [MENU]
2) Touch [RECORD SETUP]
3) Touch [ZEBRA]
4) Touch [ON]
***The Zebra patterns do not record***

Manually Adjust the Iris:
1) Touch [IRIS]
2) Touch the left and right arrows to adjust settings.
Iris/Gain value:
F16 to F1.7 (F16 is closer to closed lens and F1.7 is opening it all the way up)
0db to 18db - value closer to 18db brightens an image but makes it have a grainy look.

Recording with Manual Focus
***You want to record using manual focus, because this allows you to focus in on the deer in the shot instead of the tree limb in front of it***

Perform focus adjustments using the Manual Ring:
(While in manual mode) use the manual ring to adjust the focus.
Using Focus Assist:
1) Touch [MENU]
2) Touch [RECORD SETUP]
3) Touch [MF ASSIST]
4) Touch [ON]
While you rotate the manual ring the in-focus area is displayed in blue. The normal screen returns approximately 2 seconds after you finish bringing the subject into focus.


