Showing posts with label DSLRs. Show all posts

We have the Canon EOS 5D Mark III Camera and other DSLRS in stock!

Canon DSLR Cameras in stock:
These cameras are in hi-demand and we have them in-stock and ready to ship out!

Canon EOS 7D Digital SLR Camera with EF-S 18-135mm f/3.5-5.6 IS Lens
Main Features: All-Purpose Zoom Lens, Optical Image Stabilize, rLens 35mm Equivalent of 29-216mm, 18.0 Megapixels, 3.0" LCD, HD Video Recording, Selectable Video Exposure + Frame Rates, Dust & Weather Resistant, 100% Viewfinder, High Sensitivity (ISO 1280... Learn More


Canon EOS 7D Digital SLR Camera (Body Only)
Main Features: 18.0 Megapixels, 3.0" LCD, HD Video Recording, Selectable Video Exposure + Frame Rates, Dust & Weather Resistant, 100% Viewfinder, Self Cleaning Sensor, High Sensitivity (ISO 12800), 8fps Burst Mode... Learn More


Canon EOS 60D DSLR Camera Kit with Canon EF-S 18-200mm IS Lens
Main Features: Includes Canon EF-S 18-200mm Lens, 18MP APS-C CMOS Sensor, 1920 x 1080 HD Video Capture, SD/SDHC/SDXC Memory Card Slot, Vari-Angle Clear View 3.0" Flip-Out LCD, DIGIC 4 Image Processor, 5.3 fps Continuous Shooting... Learn More


Canon EOS 60D DSLR Camera Kit with Canon EF-S 18-135mm Lens
Main Features: Canon EF-S 18-135mm Lens, 18MP APS-C CMOS Sensor, 1920 x 1080 HD Video Capture, SD/SDHC/SDXC Memory Cart Slot, Vari-Anlge 3" LCD Screen, DIGIC 4 Image Processor, 5.3 fps Continuous Shooting, ISO 6400- expandable to 12800, HDMI Output to HDT... Learn More


Canon EOS 60D DSLR Camera (Body Only)
Main Features: 18MP APS-C CMOS Sensor, 1920 x 1080 HD Video Capture, SD/SDHC/SDXC Memory Card Slot, Vari-Angle Clear View 3.0" Flip-Out LCD, DIGIC 4 Image Processor, 5.3 fps Continuous Shooting, Works with all Canon EF and EF-S Lenses, ISO 6400... Learn More


Canon EOS 5D Mark III Digital Camera Kit with Canon 24-105mm f/4L IS USM AF Lens
Features: 22.3MP Full-Frame CMOS Sensor, Includes Canon EF 24-105mm f/4L Lens, 3.2" Clear View High Resolution LCD, DIGIC 5+ Image Processor, 61-Point High Density AF, Full HD 1080/30p and 720/60p Formats, Built-In HDR and Multiple Exposure Modes, Etc... Learn More


Canon EOS 5D Mark II Digital Camera Kit with Canon 24-105mm f/4L IS USM AF Lens
Main Features: 21.1 Megapixel Full-Frame Sensor, 3.0" High Resolution LCD Display, Live View Mode, 1080p Movie Mode, Dust & Weather-Resistant, Self Cleaning Sensor, Broad ISO Range (50-25600), 3.9 fps Burst Mode... Learn More


Canon EOS 5D Mark II Digital Camera (Body Only)
Main Features: 21.1 Megapixel Full-Frame Sensor, 3.0" High Resolution LCD Display, Live View Mode, 1080p Movie Mode, Dust & Weather-Resistant, Self Cleaning Sensor, Broad ISO Range (50-25600), 3.9 fps Burst Mode... Learn More


Canon EOS Rebel T3i EF-S 18-55 IS II Kit
Main Features: SD/SDHC/SDXC Memory Card Slot, 18MP APS-C CMOS Sensor, Canon EF-S 18-55mm IS II Lens Included, 3.0" Clear View Vari-Angle LCD, 100-6400 ISO, Full HD Movie Mode w/ Manual Exposure, Compatible with Canon EF and EF-S Lenses, 3.7 Frames/Second... Learn More


Canon EOS Rebel T3i EF-S 18-135mm f/3.5-5.6 IS Kit
Features: SD/SDHC/SDXC Memory Card Slot, 18MP APS-C CMOS Sensor, DIGIC 4 Imaging Processor, 3.0" Clear View Vari-Angle LCD, 100-6400 ISO, Full HD Movie Mode w/ Manual Exposure, Wide-Angle 18-135mm (29-216mm Equi) Lens, 3.7 Frames/Second Continuous Shoot....Learn More

Example footage of the Canon EOS 5D Mark III with Canon 24-105mm f/4L IS USM AF Lens

This was taken from www.twolightfilms.com:

"I ordered my 5D mkIII with the 24-105mm kit lens which is an L series lens, not your average kit lens, so I’m really excited about starting to create some good stuff. I’ve been watching lots of footage from this camera and came across this one which I really liked. You’ll see that the 5D mkIII is pretty damn clean and sharp when used properly."
Great job Rod Guajardo


And this was also from www.twolightfilms.com:

Canon 5D Mark III Short Film:
Check out this really cool short film about, well, I’m not sure what’s it really about, but it looks beautiful. All shot with the Canon 5D mkIII. It’a amazing what you can do with just 3 people these days. This is why I love filmmaking using new technology. We live in some really cool times where with just a few friends, a DSLR, some gear and a laptop, you can create images like these.

Indi Jibs & Indi Sliders- Example Video

Indi Jibs & Indi Sliders

We are excited to start carrying a cost effective solution for your jibs and slider requests!
introducing the IndiSLIDER Mini, IndiSLIDER Pro, & Indi Go-Jib.


IndiSLIDER Mini-


24" of compact, light-weight, fast set-up sliding. Everything that is needed to make 'those' shots you've seen on other peoples' work is available.
With the new indiMOUNT on the glide carriage, no fluid head is needed. Attach the camera to the mounting puck and attach into the holder. This also allows for the camera to be rotated and locked for fixed position shots, or used as a panning device.
Attach to a tripod quick release plate, or directly to the tripod flat base. Either option works.
The light weight of the indiSLIDERmini allows it to be used directly on a fluid head. This allows a quick release plate to be utilized, and also the creativity that mounting the indiSLIDERmini to an infinitely adjustable fluid head brings.
It includes table legs so that the mini can be placed directly on a hard surface and used without a tripod. Imagine the possibilities for close up and close quarter shots.

IndiSlider Mini from Rash on Vimeo.


IndiSlider Pro 36" 


Built using industrial technology, the indiSLIDERpro has a weight load of over a TON! Yes, that's correct, unlike competitor's dual stainless steel rod system, the indiSLIDERpro will not bend or flex. This allows much higher weight loads...all the time gliding with ease.
• 36" slider.
• Carriage brake.
• Adjustable tension glide blocks.

The Last Days of Autumn - A Canon 7D film from Paul Frederick on Vimeo.


Snow Motion - HD from Steven Dempsey on Vimeo.


indiGO-JIB w/ Water Containers 


An establishing jib shot. We've seen countless movies open with them. We see them in almost every commercial. And they are always eye-catching.

However, jibs are bulky, they're heavy, unwieldy and expensive. Transporting them gets dodgy, let alone the time it takes to set them up.

A jib that would fold down to 42", support up to ten pounds of camera and accessories, have an over 8' height reach, and cost under $400?

Folds up to about the size of your tripod. Mounts onto a standard fluid head (example 501 or 503 head) for smooth pans. Has a unique patent pending weight adjustment bar; no more trying to get that elusive exact weight. Slide to balance.  Has the 4 liter water containers. No more schlepping steel plate weights to a shoot. Attach the containers, fill with water or sand—even gravel/dirt—then easily empty when finished shooting. Transport with empty containers.


Behind the Scenes with the IndiGO-JIB from Session 7 Media on Vimeo.

HDR - High Dynamic Range - in the EOS 5D Mark III

HDR - High Dynamic Range - in the EOS 5D Mark III
blog from Canon


The EOS 5D Mark III is the first Canon EOS SLR camera to offer in-camera HDR shooting capabilities. While its capabilities obviously won't match those of a full-blown HDR software program in your computer, it does indeed open up some new doors and creative possibilities for many different types of EOS shooters. HDR shooting is easy to apply on-location, and offers several different options for final results beyond simply expanding visible dynamic range.

The basic process for in-camera HDR shooting is as follows:
• Activate HDR Mode in the camera's Shooting Menu
• Choose the effect you want in the finished picture, again from the HDR menu
• Take three bracketed shots which can be set-up in the HDR menu (+3EV, -3EV and 0EV for example)


The camera then processes the three bracketed shots, and delivers a fourth image file (a finished, processed HDR result) on the memory card. We'll go through the steps in more detail here, and give some insight into the feature's possibilities as well.

Activating HDR Mode – the Creative Photo button:
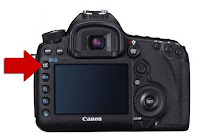
The EOS 5D Mark III has a new button on the left-rear of the camera, called the Creative Photo button. Marked with an icon of a paintbrush, it's a short-cut to three commands related to image control on the EOS 5D Mark III: Picture Style, Multi-exposure mode, and HDR mode. Pressing this button, scrolling to the HDR icon, and pressing the SET button instantly brings-up the full HDR Mode menu. (You can also access the HDR menu in the third Shooting Menu, with the red-colored tabs.)


The first step is activating HDR Mode. Do this in the very first setting – Adjust dynamic range. By default, out of the box, this is set to "Disable HDR". Press SET, and activate the range of auto exposure bracketing you want to apply:


AUTO: 
The camera reads the brightness range of the scene, and on its own makes a determination of the ± exposure needed for three bracketed shots, from which a final HDR image will be created in-camera.
±1 EV, ±2 EV, or ±3 EV:
The shooter manually chooses to have a fairly narrow range of exposure difference, or a wider range, for the three bracketed shots that will be taken. A wider range is generally more useful when shooting in bright sunlight or other high-contrast conditions.
Even though there's a separate entry in the red Shooting Menu for AEB (Auto Exposure Bracketing), don't set it here if you want to create in-camera HDR Mode images. If AEB is activated here, you'll find the entire HDR mode is grayed-out, and not available. Of course, if your intent was to shoot bracketed shots and then use third-party HDR software in your computer to create High Dynamic Range images, then you should use the AEB command in the 2nd Shooting Menu.


JPEG images only
For technical reasons, the EOS 5D Mark III's in-camera HDR Mode requires JPEG processing, and can only be done with bracketed JPEG shots. If they camera has been set to any of its RAW image settings, it will take the three bracketed "source" images as RAW files – but the finished, processed HDR image that results will be a Large (full-resolution) JPEG file. It's not possible for the final HDR image to be a .CR2 RAW file.

If the bracketed source images are shot as reduced-resolution JPEGs, the final HDR image that results will likewise be at the same reduced-resolution JPEG setting.

Shooting the three bracketed exposures
Once you activate HDR Mode and choose one of the four available AEB options, you're ready to shoot the three pictures from which a finished HDR image will be created in-camera. Regardless of whether the camera's DRIVE setting is set for single-frame or continuous advance, when you press once on the shutter button, the EOS 5D Mark III will fire-off three consecutive images at a fast fps rate. This does make hand-holding with reasonably consistent composition quite attainable for the three bracketed shots. Just be aware that there is no option for "single frame" shooting of these three bracketed shots. Since you normally want as little change or subject movement in-between bracketed HDR shots as possible, shooting in rapid-fire fashion usually is a good thing.


If you are set for Manual exposure mode, shutter speed will be the value that's bracketed (changed) between exposures. It's not possible to reverse this, even if you go into Custom Controls and assign the top Main Dial to aperture control when in Manual mode.

You have the choice of saving each of the bracketed exposures, as well as the final HDR result, on the memory card. Or, if you prefer, you can save only the final HDR file, and have the camera discard the bracketed source files. This is done with the Save source images command, at the bottom of the HDR Mode menu.


Automatic alignment of images
Even if you're extremely steady at hand-holding, in all likelihood, there will be slight movement between shots during the sequence of three auto bracketed exposures that you shoot. The EOS 5D Mark III does account for this with its Auto Image Align menu option, within the HDR Mode menu. While there are obviously limits, when Auto Image Align is enabled in the Menu, the in-camera HDR processing will account for minor changes in composition among the bracketed exposures, and align them in the finished image.

Keep in mind that one effect of this is slight cropping of the finished image – even if there was essentially no camera shake or movement during the bracketed shooting sequence. If precise composition of your final, processed HDR image is important, it's probably best to (a) use a tripod for shooting the three bracketed source images, and (b) turn Auto Image Align OFF.


HDR image effects
Here is where the creative possibilities of the in-camera HDR Mode are unlocked. The EOS 5D Mark III's HDR Mode provides five different options for altering the "look" of finished HDR images. The Effect command in the HDR Menu is where these are accessed. Regardless of which Effect setting you choose, the three bracketed source images are not affected... it only impacts the finished, processed file that results from them.


• Natural
This is the first one photographers will think of for HDR shooting. "Natural" produces a flat-toned effect, with a broader range of visible highlight and shadow detail than usually would be possible with a single digital image.


• Art Standard 
Often generates a greater HDR effect, with more aggressive control of highlight and shadow brightness (in other words, more detailed tones). Greater color saturation than in the "Natural" HDR setting, but not excessive rendering of most colors. Subject outlines will have light or dark edges.


• Art Vivid
Greater color saturation, while still preserving relatively low contrast. As the name suggests, provides a more vivid finished result that may be useful for subjects having lots of flat or pastel-type colors.


• Art Bold
Even more powerful color saturation, for colors that really "pop" in the finished HDR image. Overall contrast similar to Art Vivid in many situations.


• Art Embossed 
A special-effects setting that greatly cuts down color saturation, and strongly enhances edge contrast of objects in a scene. The light or dark edges produce an effect similar to an embossed image.


You have to make your selection before you shoot your three bracketed source images. If you shoot three shots (whether or not they've been saved to the memory card), it's not possible to go back to them later and apply a different HDR Image Effect in-camera. You'd have to shoot a new series of three source images, and pick an Effect beforehand.

Of course, factors such as the lighting in the actual scene, subject contrast and colors, and the amount of exposure bracketing applied in the three source images can all have an impact on the in-camera HDR results, so the above descriptions represent a very generic "starting point", from which users can freely experiment and find what works best for them in a given situation.

Shoot a series of in-camera HDR images, or only one?
You're covered, either way. The HDR Menu's Continuous HDR option lets you choose how to work with in-camera HDR images.

The default is 1 shot only. In other words, you activate HDR Mode on the menu, take your three bracketed images, and the camera creates a finished, HDR file. Then, the next time you shoot a picture, the camera reverts back to ordinary RAW or JPEG shooting, whichever had been set in-camera. To shoot another in-camera HDR image, you'd have to repeat the menu process, starting with enabling HDR shooting.

So if you're feeling creative and want to experiment with in-camera HDR for more than one finished picture, set "Continuous HDR" to Every Shot. Now, the HDR Mode remains in effect, and each time you fire the shutter, the camera will take the three continuous, bracketed HDR images (and produce a finished, HDR image on your memory card). To get out of HDR Mode and revert back to ordinary picture-taking, you need to go back into the HDR Menu:
3rd Shooting Menu > HDR Mode > Adjust Dynamic Range > Disable HDR


A few other things to be aware of...
As with any form of HDR imagery, movement in the scene – even wind-blown flags or water, for instance – can generate unpredictable results or ghost images in the final HDR file. Where possible, you want to position the camera and compose in such a way that you absolutely limit any visible changes from movement within the scene as you shoot the three source images.

Shooting with a tripod is not essential, but definitely recommended for sharpest results in finished, processed HDR images with the EOS 5D Mark III. The Auto Image Align feature is very useful in real-world shooting (we normally suggest leaving it on for hand-held shooting). If you do disable it and shoot hand-held, it's possible that the HDR effect may be minimal if shot-to-shot alignment is not consistent.

A few other points, based on comments from Canon's engineers in Japan:

• If the Auto Image Align feature is active and the source images contain either excessively bright or dark exposures, or there are repetitive patterns in the scene (stripes, lattice-like patterns, etc.), the alignment feature may not work properly
• The same is possible in scenes with broad areas of flat, single-tone subject matter
• Color gradation in sky tones or white walls may reproduce with irregular colors or noise, in some circumstances
• In-camera HDR Mode images taken under fluorescent or LED lighting may show unnatural effects in areas lit by those artificial light sources
• HDR Mode shooting cannot be combined with any of the following camera settings: BULB exposure, AEB, White Balance Bracketing, Multi-exposure mode, Flash shooting with an EOS speedlite, ISO expansion (if it's active and you set camera to "H1", for example, HDR Mode forces ISO back to nearest standard-range setting), AF Point Display (this is disabled during playback for any HDR Mode images, even if active in camera's menu).
• Using the optional Canon Timer Remote Controller TC-80N3, it's possible to continually shoot HDR images at a user-defined time interval between shots... just be sure to allow sufficient time for not only the three bracketed source images, but for processing the finished HDR image. In general, intervals of at least 5 to 7 seconds should be sufficient. If you pre-set the number of shots on the TC-80N3, keep in mind that each final HDR image – AND the three bracketed source images – are considered ONE SHOT on the remote controller's frames counter, not 3 or 4.

Summary:
A built-in HDR Mode is something that Canon shooters have requested in the past, and with the EOS 5D Mark III targeting the sophisticated, image-conscious user, it's an ideal first place for this feature to appear. While it won't replace a dedicated HDR software program for some applications, the fact that it can be used in the field pretty much whenever the photographer desires will make it a helpful and potentially useful addition. Understanding how to apply HDR Mode, and some experimenting with its different Effects, will give each EOS 5D Mark III user the insight he or she needs to utilize this new tool to its fullest.


Canon Quick Guides- Downloadable PDF files

Canon Quick Guides

Canon QuickGuides are a free downloadable resource for EOS cameras and accessories. These PDF cheat sheets are helpful tools to carry around in your camera bag for quick reference, or to read from your computer for step-by-step guidance on specific product features and techniques.

Get started now


QuickGuide to EOS Focusing Screens: 
This guide will help you understand the benefits of using accessory focus screens. Learn the basic screen types and series, camera compatibility, proper insertion and removal of focus screens, as well as care and handling.


QuickGuide to EOS DSLR Video Recording:
Canon offers several SLR camera capable of shooting HD Video footage, including the EOS-1D Mark IV, the EOS 5D Mark II, and the EOS 7D. Learn the differences between these cameras, and how to select, set up, and start shooting video on all of them.


QuickGuide to EOS 7D Autofocus Modes: 
The EOS 7D has an advanced 19-point, all cross-type AF system, and this guide helps you make the most of it! Learn about autofocus features such as AF Shooting Mode options, selecting and expanding AF Points, and how to use Zone AF.


QuickGuide to Accurate EOS Autofocus: 
This guide will provide tips on how to ensure accurate and consistent focus with your EOS system. Master concepts and practices such as Diopter Adjustment, AF Point Sensitivity, Micro-Focus Adjustment, and more that will help you better understand your camera's AF system.


QuickGuide to Canon EF Lens Features: 
Familiarize yourself with the variety of features available on EF lenses, and how to effectively use them on EOS cameras. You may find it useful to have your EF lens(es) nearby as you review this information, to confirm what features they have and how they function.


QuickGuide to Quick Control Screen Operation:
The purpose of this QuickGuide is to familiarize you with the features available in Canon’s Quick Control screen interface and the benefits of using it.


QuickGuide to EOS Live View Features: 
This QuickGuide will review all of the features available for Canon EOS cameras when used in their Live View mode. Learn how to enable Live View, the various options in still and movie modes, as well as use of Live View for Silent Mode Shooting


QuickGuide to EOS Custom Functions: 
Learn how to customize your EOS camera for individual shooting preferences, unique photography styles, or to maximize camera performance for any situation. This Guide covers several of the most common Custom Functions across the EOS line, including how to access, save, and use each setting.


New HD video features in the Canon EOS 5D Mark III

New HD Video Features in the Canon EOS 5D Mark III:
From Canon

Want to watch sample videos shot with the EOS 5D Mark III? Click here for three short films, and accompanying behind the scenes footage: Color of Hope, Eye of the Mind, and Mario & Nette.


Canon's EOS 5D Mark III succeeds one of the industry's most significant digital SLRs ever – the previous EOS 5D Mark II. That camera wasn't the first digital SLR on the market to offer video capabilities, but it most assuredly was the first to be adopted by the video industry and applied to everything from shooting weddings and events to full-blown Hollywood cinema production. Since the 2008 launch of the EOS 5D Mark II, users have wondered what refinements in HD video recording its successor would bring to the market. In this document, we'll explore some of the new highlights for the HD video camera user.

Greatly simplified switching from still to video recording: 
EOS 5D Mark III has a new dedicated switch and integrated start/stop button on the rear of the camera. Rotating the outer collar of the switch from the 12 o'clock position (still-image shooting) to roughly the 10 o'clock position sets the camera for video recording, and immediately raises the mirror and activates Live View on the rear LCD monitor. Now, a single press on the START/STOP button begins actual recording. To stop, press the button again. Users no longer have to go through an extensive trip through the set-up Menu to comfortably switch to and from video recording mode. (It's virtually identical to the control used successfully on the EOS 7D camera.)

HD video Image Quality: 
While the previous EOS 5D Mark II was renowned for its exceptional video image quality – especially at low light levels – Canon's engineers have not rested. A totally new, full-frame CMOS imaging sensor is used in the Mark III model. And this sensor was designed from the ground-up to provide superior HD video image quality, with noticeable improvements in control of moire and false colors. Noise reductions at higher ISOs is perhaps the most readily noticeable area of quality improvement (significantly better than the Mark II model, which was already highly-regarded in that area). For both still and video recording, Canon's engineers claim about a two stop improvement in high-ISO image quality.
An entirely new DIGIC 5+ processor significantly contributes to the EOS 5D Mark III's image quality improvements, working in tandem with the new CMOS imaging sensor. DIGIC 5+ is especially critical for its role in noise reduction, and the improved EOS 5D Mark III performance in this important area. The bottom line: critical shooters concerned with maximum image quality will find that whether in bright or subdued lighting, the EOS 5D Mark III raises the bar by a noticeable margin.

Choice of video compression methods: 
Like the recently-announced EOS-1D X, the EOS 5D Mark III provides users with the choice of video compression used in-camera:

IPB compression– Unlike the "IPP" method used in the previous EOS HD-SLRs (which could not be changed in-camera), the "IPB" compression option in Canon's new EOS 5D Mark III and EOS-1D X (as of March 2012) allows for good image quality and a significant reduction in overall file size. It's especially well-suited for situations where a video shooter expects to use relatively long, continuous-running clips (think of recording an event such as a press conference), where lots of tight editing is not as likely to occur in post-production. A single 4GB file will typically allow up to about 15 minutes of continuous recording, at Full HD 1920 x 1080.

NEW: "ALL-I" compression– Entirely new, this compression method processes each frame as a single image, and each frame can be edited with its quality intact. It's ideal for situations where tight editing of short clips is expected, and offers very good flexibility for editing anywhere along a time line. The trade-off is that file sizes will be about 3x larger than those taken with either the IPB method, or those from previous-generation EOS HD-SLRs. A 4GB video file (Full HD 1920 x 1080) will contain roughly 4.5 to 5 minutes of video when recorded using the ALL-I compression method.

No more 12-minute recording limit:
The EOS 5D Mark III now instantly creates a new file on the memory card any time the size of a preceding file reaches 4GB. Without losing a moment, recording continues on the new file. Thus, continuous video recording is possible up to 29 minutes 59 seconds, spread out over as many 4GB files as required to make that happen. The maximum allowable file size for each file remains at 4GB, but unlike the previous EOS 5D Mark II, the new Mark III model has the ability to immediately create a new file, "on-the-fly". This requires no input from the photographer.

Expanded range of video recording sizes: 
Compared to the previous EOS 5D Mark II camera, the new Mark III offers a broader range of possible video recording resolutions and fps rates. The following are available on the EOS 5D Mark III's "Movie Rec Size" menu:

• 1920 x 1080 – 30 fps (25 fps if set to PAL)
• 1920 x 1080 – 24 fps
• 1280 x 720 – 60 fps (50 fps if set to PAL)*
• 640 x 480 – 30 fps (25 fps if set to PAL)

All settings except the 640 x 480 allow the choice of ALL-I or IPB video compression; the 640 x 480 setting is available only with the compact IPB compression option.
 * HD 50 fps or 60 fps recording places the greatest demands on memory card speed, especially during ALL-I recording. Required read/write speed during HD 720p ALL-I recording for CF cards is 30 MB/sec; for SD cards, 14MB/sec. 

Headphone socket for monitoring audio: 
Another big request from serious video users has been answered. The EOS 5D Mark III has a single-pin, stereo connector for industry-standard headphones to be connected, and allows monitoring sound as it's being recorded by the camera – during actual recording, as well as during playback.


View audio levels on LCD monitor during recording: 
Press the rear "Q" button during actual video recording to see a graphic indication of in-camera audio recording level. And, if you're set for manual adjustment of audio levels, you can silently adjust this during recording as well – see the next item.


Silent control with Quick Control Dial – during actual recording: 
Both new high-end EOS models have a newly-engineered rear Quick Control Dial. In addition to its conventional rotational operation, a new touch-sensitive technology has been developed. This allows the video shooter to make selections of what he or she would like to adjust – ± exposure compensation, shutter speed or aperture adjustment, manual audio recording level, or ISO setting. And, by just lightly tapping on the left or right side of the inner surface of the Quick Control Dial, its new touch-sensitive capability lets users silently make these adjustments, without the audible "click" of normal dial rotation. Two steps are required: make sure Quick Control Dial/silent operation is active in the video shooting menu, and then during recording, press the "Q" button to call-up the on-screen displays. Tap up or down to select the option to be changed, tap left or right to actually change the setting.

Time Code: 
The answer to another huge request from serious video users – the EOS 5D Mark III now incorporates SMPTE-compliant Time Code capability.


Time Code options include: 
• Count up:
 - Rec Run or Free Run

• Start time setting:
 - Manual input (Hour:Minute:Second:Frame set as start time); Reset; Set to Camera Time

• Movie Record Count:
 - Rec time or Time Code

• Movie Play Count:
 - Play time or Time Code

• Drop frame:
 - Enable or Disable

Dual card slots – CF and SD cards 
EOS 5D Mark III is the first Canon EOS model other than the top-of-the-line EOS-1D or 1Ds series to offer two card slots for recording. Separate slots for CF cards and for SD-type cards are both inside the card door. Noteworthy is the support for faster cards than previous-generation EOS models: 
• CF cards – UDMA "mode 7" support
• SD cards – SD, SDHC, or SDXC-compliant cards are supported (not compatible with UHS-I high-speed writing)

Summary: 
There's no one single headline feature for HD video recording that separates the EOS 5D Mark III from its legendary predecessor, the Mark II. But what we have is clear evidence that Canon's engineers and designers listened to the requests and suggestions of a critical group of users – HD video shooters. And they've responded, with a variety of refinements and additions that enhance the HD video shooting experience. Image quality is better than ever, control is easier, audio monitoring and adjusting is much more effective, and editing after the shooting is done is easier as well with Time Code and choices of compression method.

EOS 5D Mark III still offers all the benefits of a full-frame camera, but now, with even stronger performance aimed at the serious video pro and enthusiast. Its video capabilities merge beautifully with its superb still-imaging features, making it more than ever a go-to digital SLR for the truly critical and creative enthusiast or working professional.

Popular Posts